Showing posts with label Recipe. Show all posts

Wednesday, February 13, 2013

Valentines Day // Mini Honey Yogurt Cakes

 
So, tomorrow is Valentines Day! I plan on painting my nails tonight with red glitter nail polish in celebration. Apart from that, I don't have too many exciting plans. I have pulled a mini lamb roast out of the freezer though & I think these mini honey yoghurt cakes will be a nice accompaniment for pudding.
 
I got the idea for these from my Mum - I went to visit my family in Dunedin last weekend & Mum had made this amazing lemon yoghurt cake for afternoon tea - it was so tasty!
 
I changed the lemon juice to honey, added some vanilla paste & baked these in baking paper lined ramekins. They came out as cute little moist cakes which I dressed up with rose syrup & chopped pistachios with some yoghurt on the side (middle eastern inspiration is my favourite!)
 
The recipe is so easy, so I hope you give these a go!
 
 
Mini Honey Yogurt Cakes
3/4 C White Sugar
1 Egg
1/2 C Oil (I used extra virgin olive oil but canola is good too)
1/4 t Salt
1/2 C Yoghurt (Greek or plain unsweetened)
1 1/2 T Liquid Honey
1/2 t Vanilla Paste (or 1 t vanilla)
1 C Self Raising Flour
 
Heat oven to 180 degrees celsius & grease & line the sides & bases of 6 small ramekins (or a cheesecake tray with removable bases)
Mix sugar, eggs, oil & salt with an electric beater or whisk until thick.
Mix in yoghurt, honey & vanilla paste.
Fold n flour until just mixed.
Scoop into tins (the mixture is quite runny - I used an ice cream scoop)
Bake for 10 minutes at 180 degrees, then drop the oven temperature to 150 degrees & continue cooking the cakes for approximately 15-20 minutes until a skewer inserted into the centre of a cake comes out clean.
Cool for 5 minutes, then turn out onto a cake rack to cool completely.
Serve with rose syrup poured over (or more honey) plain yoghurt & chopped pistachios.
 
Serves 6
 
**To make a lemon version, omit the honey & vanilla paste & add 1 1/2 T lemon juice & the grated rind of 1 lemon. Serve with yoghurt & blueberries.
 
These are so yummy & stay good for 2-3 days (if they last that long!) I really want to go out & find a cheesecake tray now so I can make a whole heap of them...
 
What do you have planned for Valentines Day?
 

Kc


Friday, September 21, 2012

Recipe Post // Blueberry Pancakes

I kind of treat baking as an experiment. I know some people say you should follow the recipe to the letter - but there's so many variables! I quite often change recipes slightly to get a better result, or just make them up from scratch - like this one!

One of my favourite cafes in Dunedin makes amazing pancakes. Like, plate sized pancakes! Filled with chopped fruit (watermelon, apples, bananas, grapes...whatever is available) and yoghurt. Capers was always the first stop for a tasty hungover breakfast on a Sunday morning when I was a student. 

So, I experimented. I had to have a go at making these at home! After multiple attempts (and a few fails!) this is my recipe. They turn out like giant pikelets, kind of cake-like in texture. I hope you'll give them a try on a lazy Sunday morning one weekend!


Blueberry Pancakes

 50g Butter, melted
1 1/2 C Plain Flour
1 Egg
 1/4 C Sugar
1 C Milk
3 t Baking Powder
Blueberries

Melt butter in a bowl in the microwave. 
Add all the other ingredients and whisk/beat with an electric mixer unti all combined. 
Heat a frying pan & grease with a touch of butter.
Scoop 1/3 C lots of batter into the pan and spread out slightly until about 7mm thick. Drop 5 or so blueberries on top of the pancake. 
When the pancake starts to bubble and turn matt, flip it over.

I stack mine up with Greek yoghurt and sliced bananas inbetween, sift over some icing sugar and then douse the whole thing in maple syrup. YUM!!

I hope you enjoy my pancake recipe! What is your favourite weekend breakfast meal to make?


Monday, May 21, 2012

The Cupcake Files // Candy Floss Cupcakes

Since I moved to Invercargill I had been thinking about having a cupcake stall at a local market. At least once a week for the last few months I've been coming up with & trialling new cupcake flavours. I thought I would share some of them on my blog, because it is a big part of my life now and this blog is a little slice of my life, right?

I have decided not to share my exact cupcake recipe. I know that seems kind of mean, but I have adapted one I found & turned it into my own recipe which produces the type of cupcake I want to be known for. I've learnt some tips though that I'll share;

1. Don't over mix! It's the same idea as muffins, if you over mix they will be dry & tough.

2. You don't have to bake a filling into the cupcake. Cook it, scoop out the centre & fill with jam, frosting, curd or cream - yum!

3. An ice cream scoop is your friend - you will end up with evenly sized cupcakes - uniform is good!

So these are my candy floss cupcakes. All you have to do is...

a) Make up a basic vanilla cupcake mix. 
b) Before baking add approx 2 cups of candy floss - pulled into small tufts. Gently fold through -  don't mix until whole batter is pink, just until you have swirls of pink through it.
c) Bake cupcakes as per recipe.
d) Frost with candy floss frosting detailed below.

Candy Floss Frosting

115g Butter, softened
1 t Vanilla
60ml Milk
500g Icing Sugar
1 C Candy Floss

Add butter, vanilla & half of icing sugar to a bowl. Place candy floss in a separate bowl & pour milk over - this will melt it. Add candy floss milk to other frosting ingredients & beat until fluffy. Add remaining icing sugar & beat through. Fill a piping bag with frosting & pipe onto cupcakes. I used a 2D tip for these cupcakes.


I recently made some of these for a 7 year olds birthday party! I sprinkled them with a little edible glitter to give them some sparkle. What do you think?


Friday, January 27, 2012

Recipe Post // Greek Lamb & Feta Patties


I love taking inspiration from friends and family when I’m thinking of new meals to make. Last summer I frequently spent weekends at a friend’s house, drinking raspberry mojitos and having BBQ’s in the sunshine. I loved how her and her husband always served the meat with lemon squeezed over, with feta cheese and pita bread on the side. My friend made these amazing feta-filled patties and while I didn’t get the exact recipe off her this one is inspired by hers.

You will need;

300 – 400g Lamb Mince (or beef mince)
Juice of 1 Lemon
2 t Oregano
1 piece of bread – toasted and cut into small cubes (I like multigrain)
1 t Cumin
1 small onion, finely chopped
1 Egg
Feta Cheese – cut into cubes

1. Add all ingredients to a bowl.
2. Mix everything together with clean hands, or wear gloves.
3. Fold a small palm-full of mixture around a cube of feta until it is covered.
4a. Place on a baking tray and bake at 180°C about 15 minutes, or until just cooked.
4b. Cook on a BBQ until just cooked through. 


I serve mine in toasted pita bread, with hummus, salad and a favourite creamy dip. The lemon and feta add a nice freshness to what would otherwise be boring old BBQ patties!

What is your favourite Summer BBQ food?


Friday, December 9, 2011

9th Day of Christmas // Mini Pavlovas


While I’ve featured a few cold weather themed goodies on here, I thought it was time I threw in a kiwi favourite – the pavlova!

We always have pavlova at our family Christmas get-togethers. They’re usually made by my Grandma, Mum and Andrew’s Mum, so it’s not unusual to have 3 pavlovas in a couple of days! (we usually have the 24th December with one side of the family, then the 25th with the other side)

Here’s what Wikipedia has to say on Pavlova. Basically it’s a big meringue with a marshmellowy centre, topped with cream and usually sliced kiwifruit and strawberries. Yum yum!!

This recipe is my Mums. I’m not sure where she got it from but I think it’s out of a magazine. It’s so easy! And pretty much a no-fail recipe too.

Mini Pavlovas
You will need;

Ingredients as listed below
An electric beater or cake mixer
A spatula
Baking tray

Just follow the picture tutorial below. There is a PDF version of this post available here!


3 Egg Whites
1 C Castor Sugar
1/2 t Malt Vinegar
2 t Cornflour
1/2 t Vanilla Essence

Heat oven to 120°C. 


1. Separate egg whites into a glass bowl.
2. Beat until egg whites are stiff. They should stand up in a point when you lift the beater.
3. Slowly add the sugar 1/2 teaspoon at a time and beat through.
4. The mixture should look like this when it’s done. 


1. Add the cornflour, vanilla and malt vinegar and beat through.
2. Draw pencil circles on some baking paper; turn over so the pencil side is against the tray.
3. Spoon the pavlova mixture onto the circles and spread out, with a small dent in the centre.
4. Bake for 1 hour. The pavlovas should still be fairly white and crispy on the outside. 

Once your pavlovas are cool, whip up some cream and spread over the top. Add some chopped strawberries and kiwifruit and you’re done!


You could also top your pavlovas with passionfruit syrup, raspberries, grated chocolate....the options are endless!! Enjoy!

Like all of my '12 Days of Christmas' DIY tutorials, there is a PDF version of this blog post here. Simpy click on the link, print out the tutorial and get to work. Easy as that. Feedback appreciated!

Make sure to check out the rest of my 12 Days of Christmas posts for more awesome decorating ideas, recipes, and gift ideas!


Wednesday, December 7, 2011

7th day of Christmas // Berry Fruit Mince Tarts


While working in a Cafe close to Christmas one year I was asked to make some mini fruit mince tarts for out the front. They were so fun to make and were popular with the customers too!

Personally I’ve never really been a fan of the traditional fruit mince filling. Occasionally I will nibble at one on Christmas day but my heart is never quite in it!

I decided this year I would make some that I liked. I’m making my berry fruit mince from scratch, but if you are in New Zealand and are short on time, Barkers make a very nice berry filling you can buy in your supermarket now! (it comes in a jar like jam, it will either be in the baking section or by the jams)

I modified this recipe from a couple I found on the internet. You end up with a sticky, tart fruit mince which I could quite happily eat by itself in spoonfuls!

**Make your fruit mince a couple of days in advance of making your tarts. If you want to make it even earlier, just store it in a container in the freezer until you’re ready to use it. 

Berry Fruit Mince


Rind of 1 Lemon
Rind of 1 Orange
1/4 C Sugar
1/4 C Brown Sugar
1 Granny Smith Apple, chopped into small cubes
Juice of 1 Lemon
1 C Sultanas
1 C Mixed Dried Berries (Mine had blueberries, raspberries, cranberries and cherries)
1/2 t Cinnamon
1/2 t Mixed Spice
1/2 t Nutmeg
Pinch of Salt
1/4 t Ground Cloves
30ml Brandy, Whiskey, Rum, Sherry or Port (or brandy essence and water)

1. Pile half of the berries and half the sultanas on a board and chop finely. (You could do this in a food processor if you have one – I don’t)
2. Add all the ingredients to a saucepan and stir over medium heat until the sugar has melted, the mix begins to go syrupy and most of the liquid has evaporated.
3. Remove from the heat and leave to cool.
4. Place into a container and keep in the fridge for a couple of days before using.

Sweet Shortcrust Pastry

1 C Plain Flour
75g Butter
¼ C Sugar
1 Egg Yolk
1 T Water


1. Sift flour into a bowl.
2. Rub in butter until it resembles bread crumbs.
3. Add egg yolk and water.
4. Mix to form a stiff dough then chill for 30 minutes before using.

Putting it All Together

You will need;

Sweet Shortcrust pastry (you could use store bought stuff if you want!)
Berry Fruit mince
Small star cutter
Mini muffin trays
Circle cutter for tart base
Flour for dusting bench
Rolling pin
Oil spray to grease tins

Heat oven to 200°C.


1. Roll out pastry to about 3mm thick and cut out your tart bases with a circle cutter.
2. Press bases into mini muffin tins.
3. Add a 3/4 teaspoon full of fruit mince to each tart
4. Top with a cut out star and bake until pastry is cooked and just starting to brown, about 10 to 15 minutes. Keep an eye on them though!


Once your tarts are out of the oven, leave them to cool for a bit in their trays and then place them on a cake rack to cool completely.


All done!! These are such a nice refreshing change to the traditional fruit mince tarts. I’m going to take mine along to my Cake Decorating club’s Christmas function where I plan to have a little toothpick sign stuck in them so people know they are berry ones!

I tried some of the extra ones out on my family, they all got gave them the thumbs up and none of them like the traditional fruit tarts. I reckon it’s a winner!

Like all of my '12 Days of Christmas' DIY tutorials, there is a PDF version of this blog post here. Simpy click on the link, print out the tutorial and get to work. Easy as that. Feedback appreciated!

Make sure to check out the rest of my 12 Days of Christmas posts for more awesome decorating ideas, recipes, and gift ideas!

Monday, December 5, 2011

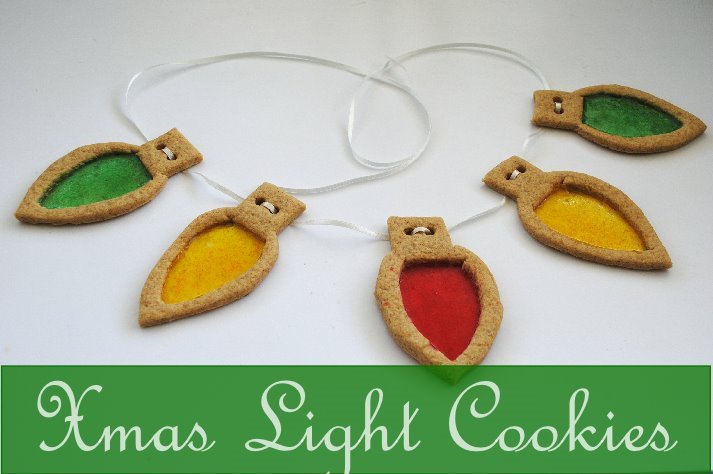
5th Day of Christmas // Christmas Light Cookies


I’ve always loved the look of stained glass windows and what could be better than a cookie version you can eat?

I used a basic biscuit dough from the Edmonds Cookbook for these cookies. (with a couple of changes) You could use the gingerbread recipe from my earlier post here, or your own favourite rolled cookie recipe. Just follow the steps to get your pretty stained glass cookies!

Cookie Dough


2 C Plain Flour
1 t Baking Powder
125g Butter
½ C Sugar
1 t Cinnamon
1 t Vanilla Essence
1 Egg

Assorted boiled lollies for stained glass effect.

Light template – available as a PDF here.

Preheat oven to 150°C bake. 

1. Sift flour, cinnamon and baking powder into a bowl.
2. Rub in butter until it resembles bread crumbs.
3. Add sugar and vanilla, lightly beat egg and add.
4. Mix to form a stiff dough. (Add a couple of drops of water if your dough is a bit dry)

5. Roll out dough on a floured bench to about 5mm thick.
6. Cut out the outside shape of the cookies and place on a baking tray
7. Cut out the inside piece of the cookie.
8. Place chosen colour of lollies in a plastic bag and smash with a rolling pin until crushed.

9. Sprinkle lolly dust into cut out window areas. Make sure there are no gaps.
10. Use a drinking straw to make 2 holes at base of cookie (will thread ribbon through these later)
11. Bake in oven for approx 10-15 minutes, until they begin to colour. Keep an eye on the lolly windows – you don’t want them to bubble up or burn, just melt.
12. Leave for a few minutes on the tray, then gently remove (be careful of windows!) to a cooling rack.


When the cookies are fully cooled, thread some ribbon through the holes at the top of the cookie and they are ready to hang on your tree/over your door in a garland. Of course you could just eat them up straight away – they look so pretty!

These aren’t just a Christmas treat too; you could use heart or star cutters and make them for a kid’s party in a bunch of pretty colours, or pull out a batch at Easter or another fun holiday.

Like all of my '12 Days of Christmas' DIY tutorials, there is a PDF version of this blog post here. Simpy click on the link, print out the tutorial and get to work. Easy as that. Feedback appreciated!

Make sure to check out the rest of my 12Days of Christmas posts for more awesome decorating ideas, recipes, and gift ideas!

Monday, November 28, 2011

Recipe Post // Chocolate Self-Saucing Pudding


I’m not even sure where I found this recipe originally, but I’ve been making it off by heart since I was 16 and it’s always been a favourite whenever I’ve pulled it out. It’s such a simple recipe and the ingredients are so basic so it was perfect to feed my flatmates back when I was a poor student!

You really can’t go past chocolate self-saucing pudding. I like mine straight-up (I’m a sweet tooth!) while Andrew usually drowns his in milk or cream if there is any floating around.

I’m trying out some new picture tutorials for my recipes as suggested by one reader. Thank goodness for long almost-summer evenings so I have light for my photos! This is a pretty basic one to start but I hope it helps some people. Either way I had fun taking the photos!

Chocolate Self-Saucing Pudding


50g Butter
1 C Plain Flour
1/2 Sugar
1/2 C Milk
2 t Baking Powder
2 T Cocoa (I usually add 2-3 I like it extra chocolaty!)
1/2 C Brown Sugar
1 T Cocoa
1 1/2 C Boiling Water

Preheat your oven to 180°C.


1. Melt Butter in a pot, take off the heat & add flour, sugar, milk, baking powder and cocoa.
2. Mix everything together and spread into the base of a greased tin.
3. Combine 2nd measure of cocoa and brown sugar and sprinkle over sponge.
4. Gently pour the boiling water over the top of the sponge and place in the oven.

Bake the pudding for approximately 25-30 minutes or until a skewer comes out clean.

This amount of pudding will serve 4-5 people nicely. I hope you enjoy it!


I must get around to doing an outfit post this week! It’s been ages since I have dressed up to be honest. Ah, the pitfalls of working from home and wandering around in track pants all day...I think I’ll have to change that!

I hope all you guys over in the USA had a great thanksgiving weekend. It looks like so much fun! Now I’m really looking forward to Christmas dinner with my family. I can’t believe it’s only a month away! Speaking of Christmas, I’ll be having a 12 days of Christmas special here on my blog starting the 1st of December!! I hope to have a sneak-preview post up in the next couple of days for you to check out and see what might be coming up. There will be gift ideas, recipes and decorating DIY’s. I can’t wait!!

Also, is anyone else having a problem where Blogger keeps logging you out when you are writing a post? I keep losing what I've written  and it's driving me nuts! I've sent a tweet to blogger and feedback but haven't heard anything back :,( Any help would be appreciated!


Monday, November 14, 2011

Recipe Post // Banoffee Cupcakes


I'm always trawling through the recipe apps at the app store on my iPhone and the other day I came across one from Primrose Bakery. After having a quick look at the screen grabs I was smitten and immediateley downloaded it!

The first recipe I wanted to try was the Banoffee Pie Cupcakes. The cake itself is so yummy and moist! I decided to use the icing recipe I have been using for my other cupcakes. I made a plain buttercream icing and then added a couple of tablespoons of golden syrup to give it a yummy caramel flavour. 

Banoffee Cupcakes

125g Butter
250g Castor Sugar
2 Eggs
1 t Vanilla
250g Plain Flour
2 t Baking Powder
4 Ripe Bananas
Dried Banana Chips (to decorate)

Frosting:
115g Unsalted Butter (I just used salted - its cheaper!)
60ml Milk
500g Icing Sugar
2 T Golden Syrup

Preheat oven to 180C. Line a tray with paper cases.
Cream butter and sugar until fluffy, add eggs one at a time until well combined.
Add the flour, vanilla and baking powder and mix again.
Mash the bananas and add, mixing again.
Spoon mixture into paper cases (I used a icecream scoop so they were all even-sized)
Bake for 25 minutes or unitl cooked through.
Leave to cool on a wire rack.

For the frosting:
Cream butter, milk, vanilla and 1/2 the icing sugar. Add the rest of the icing sugar and the golden syrup and beat to combine. Place in a piping bag with chosen nozzle attached and top cupcakes with frosting.

The recipe says it will make 12, but I managed to get 16 good-sized cupcakes out of it!
 
I think the app was $4-$5 NZ which isn't too bad for a recipe app that looks pretty, is easy to use and (so far!) gets yummy results! I took a bunch of cupcakes up to Dunedin with me to feed all of my family and they all gave them a thumbs up. 

I spent the weekend seeing 'Sleeping Beauty' with my sister, catching up with friends, shopping for summer dresses and I finally got a candy thermometer!! I can't wait to start making yummy Christmas treats.

Work is beginning to wind down for me now, as any consents for new buildings have to be in to the council within the next 2 weeks before they close over Christmas, so I'm gonna have plenty of time for baking, recipe posts and fun DIY's!

Are there any recipe apps you would recommend? What did you get up to in the weekend?


Wednesday, October 12, 2011

Guest Post // A Tea Party


Today I'm guest posting for Rosie over at Such Stuff as Dreams are Made on. She is holding a Tea Party over on her blog to recognise Mental Health Day which is the 10th October. I certainly think talking helps when it comes to depression as I've had my own battle with it in the past . So join in! The party goes all week. Here's a link for more information about Mental Health Day

Pop on over and check out my tasty Mini Baked Doughnuts recipe. Yum, yum! I love doughnuts. Every time I go to Melbourne I always go to a doughnut shop. We don't have them here! Well, not in Dunedin or Invercargill anyway. Now I can make them at home! Waaaay better....


I hope your week is going well!! I had a terrible morning yesterday trying to finish off a job for work that has been stressing me out, but I'm on to a new one today so it's looking much brighter! See ya!