Showing posts with label DIY. Show all posts

Tuesday, June 19, 2012

Drink it // Mexican Hot Chocolate


With a chill in the air and a good frost most mornings, Winter has definitely arrived in the South! My nightly routine now involves copious amounts of warm drinks and sitting in front of the fire to keep warm....and not much else, honestly!

I like to buy those tiny bottles of spirits from the liquor store. I use them for cupcakes usually, but occasionally they make their way into a hot chocolate or coffee.

In the weekend I tried out a Mexican Hot Chocolate. Follow my instructions below to make your own!

Mexican Hot Chocolate


Ingredients:

Milk (Yep - that's zero latose milk, so good!!)
Tequila
Hot Chocolate Powder
Chili Powder
Cinnamon


1. Heat milk, add chocolate powder, then use a frother on it. Alternatively, use a coffee machine to steam your milk.

2. Add 1/2 a shot (or more if you want!) tequila to your cup.
2. Add in your steamed/frothed milk.
4. Sprinkle with a pinch of chili powder, a pinch of cinnamon and some more chocolate powder. 


I served mine with a couple of pieces of chocolate on the side, marshmallows just didn't seem right! This is perfect to warm you up on a cold night - don't go overboard on the tequila as it could be overpowering. Half a shot seemed just right for mine, I personally wouldn't add anymore than that!


I hope this gives you a nifty idea to jazz up your hot drinks. Even just a pinch of chili powder and a bit of cinnamon on it's own would be enough to make it extra special. Enjoy!


Friday, February 17, 2012

Recipe Post // Cupcakes in a Jar


Next Tuesday evening I’m going to the Winery Tour concert being held in Cromwell – my favourite place in Central Otago. I’m so excited! Gin Wigmore is performing, I’ve liked her music for quite a while so I’m keen to see what she’s like live.

You aren’t able to take alcohol or drinks (except sealed water bottles I think) into the grounds, but you can take food. So I thought it would be a cool idea to take along a picnic! I’ve been wanting to try out the “cupcake in a jar” thing for a while and this is the perfect excuse.


I had an order of cupcakes due today for a customer (my business is Sequin Corner – come visit my Facebook page!) and I had some leftover, so I made a trial run. My favourite flavour is coffee and I just so happened to have a bottle of Kahlua lying around in the cupboard so I thought I’d make a yummy sauce to go with my cupcakes.


You will need;

A cupcake sized jar
Frosting of your choice
Baked cupcakes of your choice
Sauce of your choice

Coffee Frosting

115g Butter, softened
500g Icing Sugar
1 t Vanilla
60ml Instant Coffee (1/2 t coffee mixed with a dash of hot water, then made up to 60ml with cold water)
2 t Ground Coffee

Using an electric mixer – combine the butter, vanilla, coffee & half the icing sugar until creamy. Add the remaining icing sugar & beat until combined. Use a spatula to transfer the mixture to a piping bag fitted with a piping nozzle.

**I found this recipe somewhere on the internet, but I can’t remember where sorry!
Kahula Sauce

125g Butter
1 C Castor Sugar
1 Egg
1/2 C Kahlua
1 t Cream

Melt the butter in a saucepan on low heat. Add the sugar & egg & whisk to combine. Cook over low heat, stirring constantly, until the mixture is smooth & creamy and all the sugar is melted. Add in the Kahlua & cream & whisk to combine. Pour into a jug or bowl until ready for serving.

**Recipe from Simply Recipes – I altered the amount of Kahlua. 


1.    Take cupcake paper off, trim to fit in jar, & chop in 1/2. Place the cupcake 1/2 in the jar & pipe a layer of frosting over.
2.    Drizzle over a layer of the sauce. Repeat from the start – cake, frosting, sauce.
3.    I added 1 more cupcake half (my jar is tall) a layer of frosting & a final drizzle of sauce.
4.    The finished “Cupcake in a Jar”


These are so yummy! (and quite sweet!) Next time I might try layering one with custard and fruit, possibly to take to the concert. You could easily swap out the frosting and sauce I used and replace them with something else – ganache & caramel sauce, custard & pureed apples with cinnamon, raspberry puree & cream...the opportunities are endless! 

I made mine pretty by covering the tops with a paper doily tied on with string & threading a cake fork through the bit where you open the jar (I love my little fork with the piggy on it above!) you could just as easily attach a little plastic spoon or fork with some string or ribbon.  

Have you tried making cupcakes in a jar before? Or pies? I think it's a great picnic idea! Hope you all have a great weekend. 

Tuesday, December 13, 2011

Outfit Post // Pink at the Races


Yes, I still do outfit posts on my blog! It has been a while though. It’s been a busy few months settling in to my new house, getting used to working by myself from home and planning, photographing and writing my ’12 Days of Christmas’  posts. Phew!


Anyway, this is the outfit I wore to The Invercargill races in the weekend for Andrews work do. It was sooo hot!! It was such a fun day, we were divided up into groups of 5, we put in $20 each and we all picked 1 horse each per race and then put down our 5 horses as a $10 trifecta bet. The group I was in had 3 wins in the first 3 races! By the end of the day we were up $60 on our original group total, so put down $30 on each of the last 2 races. Unfortunately our winning streak was over! But we left with the $20 we started with so it’s all good.

 Dress - Made by me, Pink Fascinator - Spotlight, White Clutch - Diva,  
 White Heels - No. 1 Shoe Warehouse

I whipped up this dress on my sewing machine last Thursday and Friday night. It’s the same pattern as the dress I made for my sewing class, but I free-handed the heart cut out for the back and closed the top piece with 3 little metal closures. I read an article a while ago about a woman who was making costumes for a local event. She said that when she was young in the 1960’s, she would sew a dress on the Saturday to wear to a dance being held that night. I love that idea! Making a new dress for a special occasion. So now I have great plans for dresses for future events...


I hope you all had a great weekend! The weather here has been amazing lately. Invercargill is surprising me! Thank you for all your nice comments on my ’12 Days of Christmas’ posts! I’ve loved reading all your comments, and I hope some of the 50 or so viewers that have visited each day lately have got some new, cheap DIY ideas for their Christmas this year.

Tomorrow night I’m off to Dunedin to watch the Phoenix play soccer and go to a wedding on the weekend. I’m looking forward to it! 1 1/2 weeks until Christmas – woohoo!! 


Sunday, December 11, 2011

11th Day of Christmas // Gift Wrapping


I always end up spending so much money on wrapping paper. It certainly adds up pretty quick! I hate buying the really cheap stuff as it never stays together when you tape it and it always rips when you try and move your presents (mine always end up going on a car ride somewhere!)

This year I’m going heavy duty – I’m using brown paper! It’s nice and strong and is made of recycled material so that makes me feel a bit better. I’m jazzing it up with paper doilies and string with white and gold gift tags.

Follow the tutorial below to see how I wrapped my presents. It’s super easy and pretty!

You will need;

Brown paper (mine is from The warehouse or try a postage shop or stationary shop)
White Paper Doilies, various sizes
Gold Paper Doilies
White Card
Gift Card Pattern – available in a PDF here
PVA Glue or similar
String
Hole Punch


1. Wrap your chosen present in brown paper.  
2. Place a bit of glue on the back of a doily and stick to the top side of the present.   
3. Cut enough string to wrap around the present a couple of times.
4.  Wrap string around and tie in a knot.


1. Trace around the size of gift tag you want for your present and cut it out.  
2. Position the cut out tag under a gold doily and trim around the tag. Glue the doily to the tag.
3. Hole punch the pointed end of the tag, then write the name of the gifts recipient on the tag
4. Thread the tag onto the string on your present and tie the string in a bow.


You could use coloured doilies if you can find them, or use white doilies and coloured card for your tags.

You could also tie on some mini candy canes or chocolates to add an extra little treat to your presents! 

Like all of my '12 Days of Christmas' DIY tutorials, there is a PDF version of this blog post here. Simpy click on the link, print out the tutorial and get to work. Easy as that. Feedback appreciated!

Make sure to check out the rest of my “12 Days of Christmas” posts for more awesome decorating ideas, recipes, and gift ideas!


10th Day of Christmas // Chocolate Sleigh


At the last Dunedin Sugarcraft Club meeting I went to in Dunedin we were shown some different Christmas-themed demonstrations. My favourite was this awesome chocolate sleigh!

It would look great as a centrepiece on your table, filled up with yummy chocolates. When you’ve finished all those you can start nibbling the sleigh too! It would also make a cool present filled with chocolates or truffles and wrapped up in cellophane with a ribbon. 


You will need;

1 Bag Chocolate Buttons (I used Nestle)
Baking Paper
Sleigh Pattern – you can find that here
Piping bag
Round-tip Nozzle


1. Melt 1/2 the chocolate in microwave – 30 secs at a time until melted. Don’t burn it!
2. Add 1/4 more buttons to the chocolate but don’t microwave – just stir until they have melted.
3. Lay pattern on a table or board and cover with a piece of baking paper.
4. Fill piping bag fitted with a small round nozzle with chocolate and pipe around edge of sleigh pattern (5mm thick)


5. Spoon chocolate into the centre of the sleigh pieces, spread to the edges and then leave to dry.
6. Once the pieces are dry, set up the base, one side and the back piece leaning against glasses and pipe chocolate in the inside corners to stick them together.
7. Add the front end piece and stick with more chocolate, then the other side.
8. Leave the sleigh to dry until all the chocolate is set.

Once the pieces are dry, set up your sleigh on a presentation plate and fill up with your favourite chocolates – I’m using peppermint and strawberry Roses chocolates!


Yum yum!! You can make your sleigh out of dark, milk or white chocolate – it’s up to you. Just remember white chocolate is a little harder to work with than the other 2 – be very careful when you are melting it! 

PS: Sorry todays post is a day late! I was busy all day yesterday at Andrews work do at the races. I'll have an outfit post up next week with what I wore!

Like all of my '12 Days of Christmas' DIY tutorials, there is a PDF version of this blog post here. Simpy click on the link, print out the tutorial and get to work. Easy as that. Feedback appreciated!

Make sure to check out the rest of my “12 Days of Christmas” posts for more awesome decorating ideas, recipes, and gift ideas!

Thursday, December 8, 2011

8th Day of Christmas // DIY Body Scrubs


While thinking of Christmas present ideas for my Mum and Sister I remembered something I had been researching a while ago – homemade body scrubs!! Perfect! ( I had a look at this website)

I love body scrubs!! I love how your skin feels so nice and smooth afterwards. I think I’ll make a pink lemonade body scrub for my Sister and a peppermint foot scrub for my Mum, she loves pampering her feet!

I’ve been using the peppermint one as a face scrub in the mornings to wake me up and I can’t wait to use the coffee one in the shower.

Homemade Body Scrubs

You will need;

Sugar (See recipes for what sort)
Preserving jars
A bowl and spoon for mixing them
A variety of essences or essential oils
Sunflower Oil
Gift tags or labels (which are available in a printable PDF here!)

I’ve included a picture tutorial for the Pink Lemonade scrub, all the others are very similar so just follow the recipes!

Pink Lemonade Sugar Scrub

2 C White Castor Sugar
2/3 C Sunflower Oil
2 t Lemon Essence
Drop of red or pink food colouring


1. Measure the sugar into a bowl and mash through the colouring and essence.
2. Add the lemon essence and colouring.
3. Begin adding the oil slowly; stir to combine until mixture looks like wet sand.
4. Fill up your chosen container and attach the label. Find it here.

Coffee Body Scrub

2 C Ground Coffee
2 T Castor Sugar
2/3 C Sunflower Oil
2 t Ground Cinnamon

1. Measure coffee into a bowl.
2. Add the cinnamon and the sugar. 
3. Begin adding the oil slowly; stir to combine until mixture looks like wet sand.
4. Fill up your chosen container and attach the label. Find it here.

Brown Sugar Scrub

2 C Brown Sugar
2/3 C Sunflower Oil
2 t Vanilla Essence

1. Measure the sugar into a bowl.
2. Add the vanilla essence.
3. Begin adding the oil slowly; stir to combine until mixture looks like wet sand.
4. Fill up your chosen container and attach the label. Find it here.

Peppermint Foot Scrub

2 C White Castor Sugar
2/3 C Sunflower Oil
1 1/2 t Peppermint Essence

1. Measure the sugar into a bowl and mash through the essence.
2. Add the peppermint essence.
3. Begin adding the oil slowly; stir to combine until mixture looks like wet sand.
4. Fill up your chosen container and attach the label. Find it here.


Make sure to take note of the warning on the labels – the oil residue can build up on the base of your shower and make it slippery, so make sure the recipient knows about this to avoid any accidents! I just keep a shower cleaner in my bathroom cupboard and give the shower a quick spray and scrub it clean with a brush after my morning shower. It takes 2 minutes! 


Like all of my '12 Days of Christmas' DIY tutorials, there is a PDF version of this blog post here. Simpy click on the link, print out the tutorial and get to work. Easy as that. Feedback appreciated!
                                                             
Make sure to check out the rest of my 12Days of Christmas posts for more awesome decorating ideas, recipes, and gift ideas!


Tuesday, December 6, 2011

6th Day of Christmas // DIY Dog Pull Toy


You can’t forget the family dog at Christmas!! I have a Chocolate Labrador called Hershey, she was born on the 4th of July (cool huh?) last year so she’s about 16 months old. While I love her to bits, I don’t love her amazing ability to destroy any toy we give her!! (Or shoe, or cushion, or sock...)

When we took her to obedience training a while ago one of the women there had a plaited bunch of sheets as a reward toy for her collie. So instead of wasting money on a toy from a store, I’m going to make her these from now on. 


While I could have kept it for Christmas, I love her reaction when I give her a new toy so I couldn’t help giving it to her straight away. She galloped around the house with it, slobbered all over it and dropped it in my lap for me to throw for her. Too cute! (Also, it’s still in one piece so far!)

Just follow this tutorial to make your dog a special pull toy for Christmas out of old sheets or material you have lying around!


You will need;

Old Sheets or material scraps
Fabric Scissors


1. Make a snip in your material about 2.5cm (1 inch) from the edge. (I made the snips in the long edge of my sheet, meaning the short edge was the length of my strips)
2. Rip material strip off main piece of material.
3. Cut the strip in half.
4. Repeat process until you’ve ripped 9 long strips, making 18 half-strips


5. Divide the strips into 3 groups of 6. (I had one all pink, one all patterned and 1 a mixture)
6. Place all strips together and tie a knot at one end and pull it tight.
7. Plait the 3 groups of strips together.
8. Tie another knot at the other end, pull it tight and trim ends to make them even. 


Easy as! You could make one with less strips for a smaller dog, or keep the pieces the full length to make one for a big dog. Hershey is pretty small for a Labrador so this was a perfect size for her. She certainly enjoys playing with it!

Like all of my '12 Days of Christmas' DIY tutorials, there is a PDF version of this blog post here. Simpy click on the link, print out the tutorial and get to work. Easy as that. Feedback appreciated!

Make sure to check out the rest of my 12Days of Christmas posts for more awesome decorating ideas, recipes, and gift ideas!


Monday, December 5, 2011

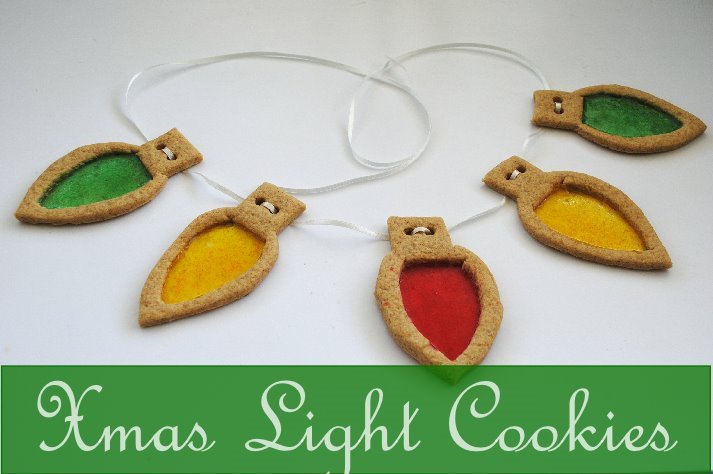
5th Day of Christmas // Christmas Light Cookies


I’ve always loved the look of stained glass windows and what could be better than a cookie version you can eat?

I used a basic biscuit dough from the Edmonds Cookbook for these cookies. (with a couple of changes) You could use the gingerbread recipe from my earlier post here, or your own favourite rolled cookie recipe. Just follow the steps to get your pretty stained glass cookies!

Cookie Dough


2 C Plain Flour
1 t Baking Powder
125g Butter
½ C Sugar
1 t Cinnamon
1 t Vanilla Essence
1 Egg

Assorted boiled lollies for stained glass effect.

Light template – available as a PDF here.

Preheat oven to 150°C bake. 

1. Sift flour, cinnamon and baking powder into a bowl.
2. Rub in butter until it resembles bread crumbs.
3. Add sugar and vanilla, lightly beat egg and add.
4. Mix to form a stiff dough. (Add a couple of drops of water if your dough is a bit dry)

5. Roll out dough on a floured bench to about 5mm thick.
6. Cut out the outside shape of the cookies and place on a baking tray
7. Cut out the inside piece of the cookie.
8. Place chosen colour of lollies in a plastic bag and smash with a rolling pin until crushed.

9. Sprinkle lolly dust into cut out window areas. Make sure there are no gaps.
10. Use a drinking straw to make 2 holes at base of cookie (will thread ribbon through these later)
11. Bake in oven for approx 10-15 minutes, until they begin to colour. Keep an eye on the lolly windows – you don’t want them to bubble up or burn, just melt.
12. Leave for a few minutes on the tray, then gently remove (be careful of windows!) to a cooling rack.


When the cookies are fully cooled, thread some ribbon through the holes at the top of the cookie and they are ready to hang on your tree/over your door in a garland. Of course you could just eat them up straight away – they look so pretty!

These aren’t just a Christmas treat too; you could use heart or star cutters and make them for a kid’s party in a bunch of pretty colours, or pull out a batch at Easter or another fun holiday.

Like all of my '12 Days of Christmas' DIY tutorials, there is a PDF version of this blog post here. Simpy click on the link, print out the tutorial and get to work. Easy as that. Feedback appreciated!

Make sure to check out the rest of my 12Days of Christmas posts for more awesome decorating ideas, recipes, and gift ideas!

Sunday, December 4, 2011

4th Day of Christmas // Tissue Paper Pom Poms


I have seen quite a few pictures of these awesome tissue paper pom poms floating around the internet of late. I think they would make some pretty cute Christmas decorations too! You could make big ones to dot over a feature wall or little ones to hang on your Christmas tree or make them into garlands to hang over doorways. After searching around for a tutorial I figured out how they were made and whipped up my own pom poms in no time!

Here is a great little tutorial I found on Martha Stewart Weddings. Below you can see my own little photo tutorial to make these cool decorations!


 You will need;

Tissue paper – 9 layers cut to the width you want your pom pom
Florists wire – 24 gage (Try somewhere like Spotlight or a Cake Decorators Shop)
Pliers
Scissors


 1. Lay tissue paper on top of each other. Mine came in a pack of 3 sheets, so I cut them into 1/4’s and laid 3 of them on top of each other.
2. Fold tissue paper into a fan.
3. Fold a piece of florists wire over the centre and twist the ends to secure it.
4. Cut of both ends of rectangle – either into a point or a curve depending on the effect you want. 


5. Begin releasing each layer of tissue paper and pull up towards the centre.
6. Lift top 5 layers, then turn over and repeat with bottom 4.
7. Do all of one side of the pom pom, then switch and do the other side.
8. Your finished pom pom!!


See, I told you they were easy! Of course they would make great decorations for a Wedding, Bridal Shower, Baby Shower or Birthday too. Something to keep in mind!

Like all of my '12 Days of Christmas' DIY tutorials, there is a PDF version of this blog post here. Simpy click on the link, print out the tutorial and get to work. Easy as that. Feedback appreciated!

Make sure to check out the rest of my 12Days of Christmas posts for more awesome decorating ideas, recipes, and gift ideas!